How to Shoot the Milky Way
Ever see images like the one above and wonder, how in the world do you take a picture of the Milky Way like that? In this tutorial, local customer Steve Choryan, breaks down everything you need to have and need to do for capturing your very own Milky Way photographs. He photographed his images in the northern parts of Michigan.
Equipment There are a few things that you will need. Here is a quick checklist of the most helpful things, which I will explain why later on.
Location and Planning In order to capture the best possible Milky Way photos, you'll want to choose a location that is extremely dark. Why is that? Light Pollution!! Big and small cities emit large amounts of light pollution that prevent us from seeing the Milky Way. So when planning your location, you'll want to go somewhere that has very low light pollution and try to minimize outside light sources like houses, street lights, etc. 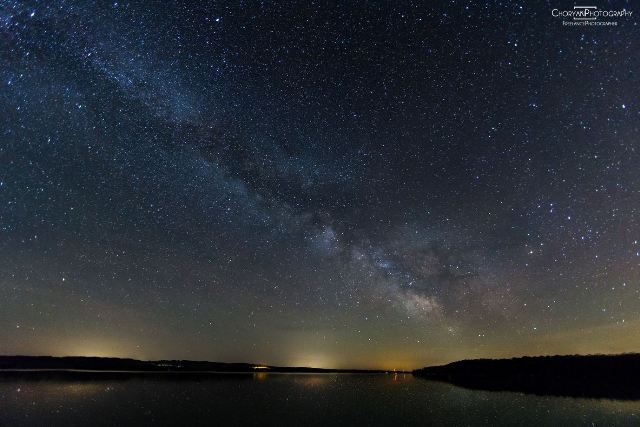 After you have your location, the next two important factors are the moon cycle and the weather. Ideally, you want to shoot when there is no (or very little) moonlight so you have the least amount of ambient light as possible. In general, you have about 10 days to shoot with little to no moonlight each month. Next is the weather. You want there to be little or no clouds, otherwise it will block the Milky Way and look hazy. The Milky Way generally comes up anywhere between midnight and 4:30 am, and its best to get to your location early to set up. Make sure you have a wipe or lens towel because dew will start to form on your lens in the summer months. Camera Settings Once you're on location and settled in, its time to dial in your camera. The first thing to do is turn your DSLR to manual mode! If you are running a lens with an aperture of F2.8, these are the settings I use for those lenses: For Full Frame Users White Balance: Tungsten Shutter Speed: 15-20 Seconds Aperture: F2.8 ISO: 2500-4000 If you are on a crop sensor body, use the following settings: White Balance: Tungsten Shutter Speed: 20-30 Seconds Aperture: F2.8 ISO: 2500-3200 Settings Breakdown Choosing tungsten as your white balance brings out the white in the stars better. Once you get to post processing you can change it to a warmer color. Shutter speeds vary for full frame and crop sensor. Full frame sensors tend to see more movement at 30 second exposures than a crop sensor, hence the setting difference. One thing to remember is that the earth is moving and the shorter the exposure you can take, the sharper the image will be; but this is dependent on how well your particular camera body can handle high ISO. My Canon 6D handles pretty high ISO ranges and is still sharp. If I take a shot at F2.8, ISO 5000, shutter speed 15 seconds, it's still sharp with very little grain. Most crop sensor bodies cannot handle high ISO ranges without getting grainy. If I shot on my Canon T3i with those same settings, the picture would be unusable. So to compensate, you use a longer shutter with a lower ISO range to maintain sharpness. Focusing at Night You won't be able to use the eye piece to focus on the stars because its simply too small and too dark out. Below are the steps I use to set the focus. Step 1: Switch lens to manual focus. You will have to set the focus yourself. Step 2: Turn on live view on your display screen on the back of your camera. Step 3: Hit the zoom button on the camera so that the display zooms in 10x. Step 4: Find the brightest star/stars on the viewfinder and manually focus the image till it's sharp. Lenses have an infinity symbol on them and your focus point will end up being somewhere either right on the infinity mark or close to it, depending on the lens. Step 5: Once you've set the focus, zoom back out to normal viewing mode and you are set to take your first picture. Post Processing I use Lightroom and Photoshop to edit all of my photos. When you open your Milky Way shots in Lightroom or whichever editing program you are using, you will want to change your white balance to a slightly warmer temperature. From there, adding contrast, sharpness and other things are up to the photographer. I always like to remove as much grain as possible and there's a specific function in Lightroom to do so, but these are all personal preferences. 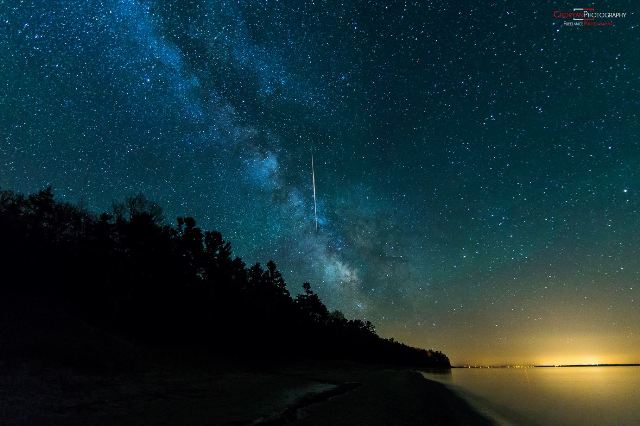  Steve Choryan has been a Design Engineer in automotive for 15 years. When hes not designing engines, hes out shooting. Hes been shooting for almost 3 years now and shoots automotive, landscape and events. When Steve first started in automotive photography, he would go to local car shows and take pictures; from there, hes progressed to automotive rallies. Clients from all over Michigan come out and let Steve shoot their cars and many other things on location. Events are also something Steve loves doing because they are action-packed. Steve has covered everything from Kid Rock to the Detroit Grand Prix. Steve's Facebook |