|
How to Light Paint a Car
Light painting is a fun, creative, and unique way to bring something refreshing to your photography and make things pop. Steve Choryan, one of our local frequent customers here at LensGiant, gives you a walk-through tutorial on light painting cars.
Equipment First off, you need a tripod (any tripod will do). You’ll be taking pictures in the dark so this is a critical component. The next thing you need is a light source. The flashlight I use is a rechargeable LED light that I bought at home depot for $35, but any light will do (even cell phone lights). The better the light, the easier it will be to light the car. The third item is optional; a shutter release cable. I use the shutter cable because I do not want the tripod or camera to move at all. As far as camera bodies go, you can use any DSLR that has a manual mode because you will have to manually set the shutter speed/ISO/aperture. Currently I use a Canon T3I and it does rather well for a crop sensor. I always avoid extreme wide angles when light painting a car, as it distorts the car too much. When I rent from LensGiant, I tend to rent the Canon 16-35L F2.8 or the Canon 24-70 F2.8L. Both of these lenses are amazingly sharp for this type of work. You can use kit lenses if it's all that you have, but being able to rent great glass at fantastic prices from LensGiant makes it a no-brainer when you are shooting high-end clients. Location Go to a place that is very dark and has little to no light. The darker the better because when the camera is set to a long exposure, it’s only going to see the light you’re putting on the car. If there is a lot of ambient light, the car will have lots of light pollution and reflections from the other outside sources and it will make light painting much more difficult. Camera Settings Once you’re on location with your car angled the way you want it, mount the camera to the tripod and plug in your shutter release. If the location is completely dark, turn the flash light on and auto focus on the car. Once the camera has focused, take your finger off the shutter button and turn the auto focus off. As long as you do not move the tripod, the lens will remain focused on the car. Then dial in your settings. In general, I start with these and do a test shot to see if I need to add ISO: Shutter - 30 seconds ISO - 100 Aperture - F8 Timer - 10 seconds White balance is up to the user. I go between daylight and tungsten depending on the color of the car. These are my starting settings. Generally for darker cars I will bump the ISO to 200 so the light is brighter on the car. With white and silver cars, ISO 100 works well. Set the timer to allow yourself enough time to get to the car and get into position to light paint it; you don’t want to be running in the dark from the tripod to the car. Painting the Car Once the timer starts, walk to the car, raise the light above your head, and when the shutter opens, walk in one slow fluid motion starting at the front left of the car, all the way around the car and stop where you started. You must do this because you need to “edge light” the back of the car so that it doesn’t wash out in the darkness. As you walk back around to the front of the car, drop the light to your leg and light the lower portion of the car. Use your leg to block the light from the camera… which might sound confusing, but it really isn’t. On the lower part of the car facing the camera, you do not want the camera to see the light source (in this case, the flashlight). By using your leg to block the source, the camera picks up only the light reflecting on the car as you walk. You only have to light paint the front of the car and the side facing the camera when lighting the low part.  When it’s done correctly, you should have plenty of time to walk around the entire car 1.5 times before the exposure ends. Walking too fast with the light will result in a darker image; walking too slow will not give you enough time to finish light painting. Also important is the distance from the car. It’s critical. I try to stay between 2 to 3 feet away from the car. The first image is what it looks like raw before.
When I first started light painting, I used to leave the halo around the car. I have since moved away from that and went with a cleaner look by removing it. To get rid of the halo, take another shot with the exact same settings and do not light paint it. Post-Production For post production, I use Light Room for color toning and sharpening. Then I use Photoshop and overlay both images. I use layer masking to remove the light halo from the picture and use the clone stamp and spot heal to take out any reflecting light, dirt, or small blemishes from the car to create a smooth final image. This can be a time consuming process depending how many weird reflections you get on the car from ambient light sources. You can see in the the raw image; there are lots of little light spots from ambient sources that have to be taken out in post production. Don’t worry; it’s not difficult, just time consuming. This is why finding a location with little to no light will make the process easier in post. Sometimes, depending on the type of shot you are going for, it just can’t be avoided and a little extra processing time taking out those reflections is needed. Here are the two final images after processing them in Light Room and Photoshop. The first location on Belle Isle, Detroit had a lot of ambient light, so the post processing took longer. The second image is at another spot on Belle Isle were there was hardly any ambient light to affect the shot. 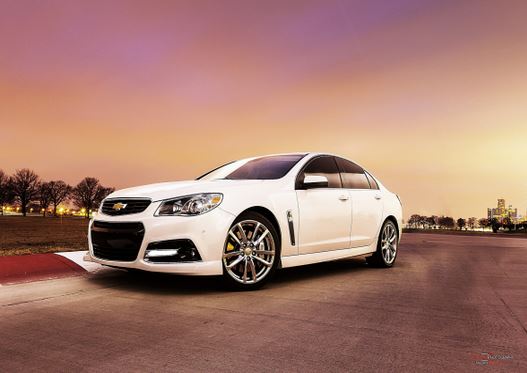 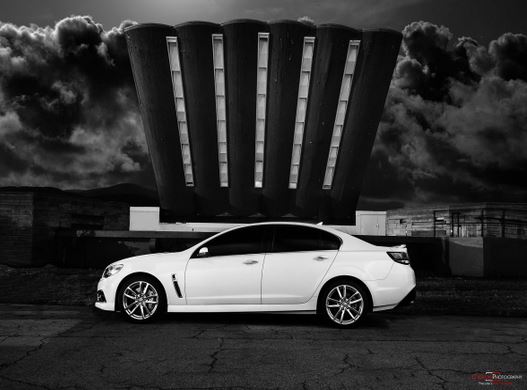
In the second image you will see that I light painted the background. This is created with a 3rd exposure. I use a flashlight and the same settings as before and paint even, broad strokes on the background, just as if you were painting a garage. I generally go over the background with the light two times and highlight what I want to stick out to help bring the image to life. You can leave it dark if you choose to or you can use strobes to flash the background as well. Once I have finished light painting the background, the post production process is the same except for adding another layer that I have to layer mask away. 
Steve Choryan has been a Design Engineer in automotive for 15 years. When he’s not designing engines, he’s out shooting. He’s been shooting for almost 3 years now and shoots automotive, landscape and events. When Steve first started in automotive photography, he would go to local car shows and take pictures; from there, he’s progressed to automotive rallies. Clients from all over Michigan come out and let Steve shoot their cars and many other things on location. Events are also something Steve loves doing because they are action-packed. Steve has covered everything from Kid Rock to the Detroit Grand Prix. Steve's Facebook |